AI · Setup & Infrastructure
ComfyUI — Philosophy and Interface
An empty canvas, no text field, no "Generate" button — and why that's exactly right.
Stability Matrix is installed, ComfyUI is running, the browser opens. What you see: a dark canvas, maybe a few default nodes, no text field, no "Generate" button. Anyone coming from Adobe Firefly or Midjourney instinctively looks for an interface — and finds none.
This isn't an unfinished product. It's a design decision.
ComfyUI doesn't show you an interface for image generation. It shows you the process itself — as a graph where every step is a node and every connection between nodes is a data flow. Text prompt in, conditioning out. Conditioning in, sampler processes, latent out. Latent in, VAE decodes, image out. This process runs inside every AI image generation tool — ComfyUI makes it visible instead of hiding it.
That comes at a cost: the learning curve is steeper than a text field. And with a benefit: once you understand the graph, you understand what the model is doing — not just how to operate it.
Optional · Running ComfyUI without Stability Matrix
The practical split: install and maintain everything with Stability Matrix — installation, updates, model downloads — and when memory runs tight, run the actual image production without it. It isn't either/or: thanks to extra_model_paths.yaml (see below), the standalone ComfyUI reads the very same models Stability Matrix downloaded.
Why it helps when RAM is scarce: ComfyUI is a standalone Python application and starts on its own, so dropping the management layer frees memory — the app and its background processes hold RAM the model would otherwise have. This matters because the entire model has to fit into RAM at once, and on macOS, where memory is allocated dynamically (unified memory), every gigabyte not held by another application goes straight to the model. On a 16 GB system that headroom can decide whether a model loads at all. (Activity Monitor shows the actual difference on your machine.)
One-time setup on macOS (Apple Silicon):
git clone https://github.com/comfyanonymous/ComfyUI
cd ComfyUI
python3 -m venv venv
source venv/bin/activate
pip install torch torchvision torchaudio
pip install -r requirements.txt
Then start it — from the ComfyUI folder, with the virtual environment active:
source venv/bin/activate
PYTORCH_ENABLE_MPS_FALLBACK=1 python main.py
ComfyUI uses Apple's GPU via MPS automatically. Open http://127.0.0.1:8188 in the browser — the interface is identical to the one launched through Stability Matrix. The PYTORCH_ENABLE_MPS_FALLBACK=1 flag lets any operation not yet implemented on MPS fall back to the CPU instead of stopping the run.
Models already downloaded in Stability Matrix? The multi-gigabyte files don't need to be moved or duplicated. Copy extra_model_paths.yaml.example to extra_model_paths.yaml and point it at the existing Stability Matrix model folders — the standalone ComfyUI then reads the same checkpoints, diffusion models, and VAEs.
Loading the first workflow
Before the graph makes sense, you need something to read. Two ready-made minimal workflows are available for download — one for SDXL, one for Flux.1 dev. Both are stripped to the essentials: no ControlNet, no LoRAs, no extra nodes. Just the core.
Load via Load in the ComfyUI menu bar, or drag and drop the JSON file directly onto the canvas. The workflow appears as a node graph.
Start with the SDXL workflow.
The SDXL workflow — node by node
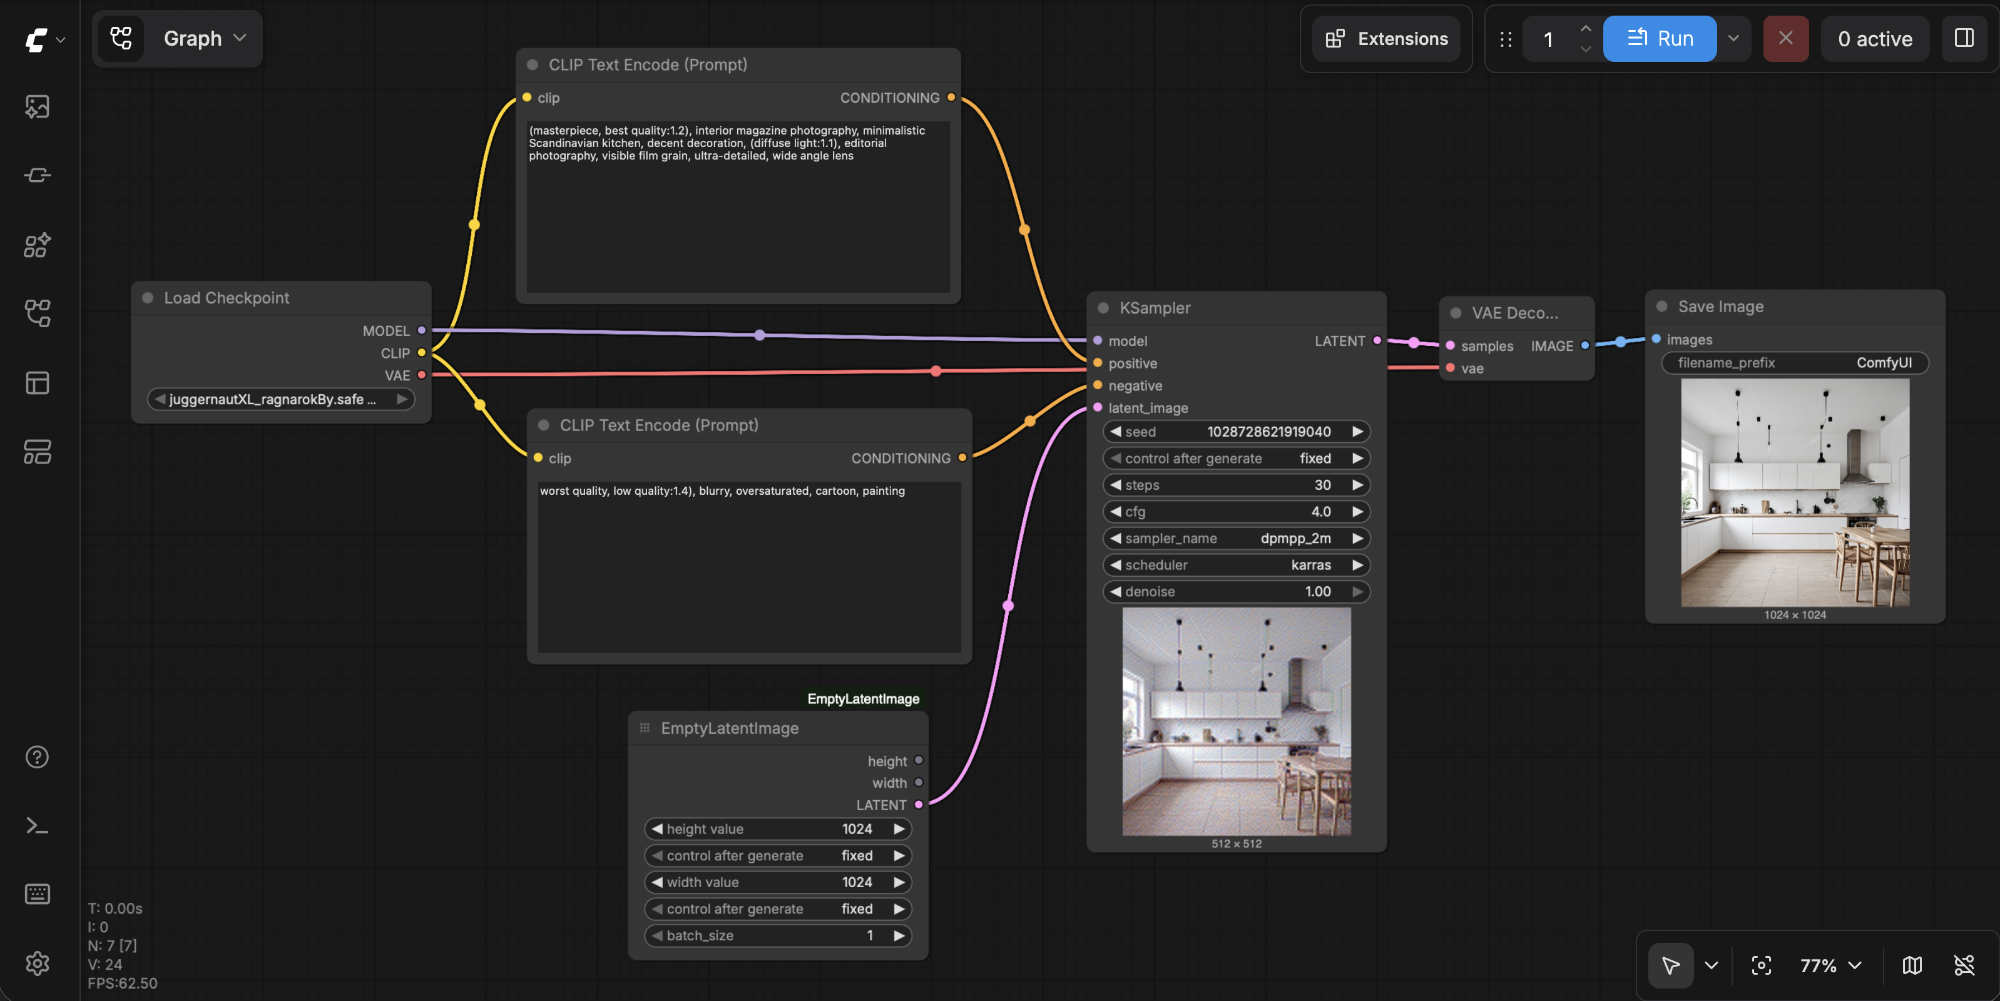
The graph has seven nodes. Read left to right, a clear data flow emerges — each node takes something in, processes it, passes something on.
Node 1
CheckpointLoaderSimple
The starting point. This node loads the SDXL checkpoint — Juggernaut XL in this case — and outputs three things: the model (MODEL), the CLIP encoder (CLIP), and the VAE. One node, three outputs. This is possible because SDXL checkpoints bundle all three components in a single file.
Outputs: MODEL → KSampler · CLIP → both text fields · VAE → VAEDecode
Nodes 2 + 3
CLIPTextEncode (positive) / CLIPTextEncode (negative)
Two nodes, same structure, different roles. Both receive the CLIP encoder and convert a text prompt into CONDITIONING — a format the model understands. The positive node describes what should be in the image, the negative what shouldn't. Both feed into the KSampler.
Node 4
EmptyLatentImage
This node creates the empty workspace for diffusion — a field of random noise at the specified resolution. 1024×1024 is the SDXL standard. The result isn't an image yet, but a latent: a compressed representation in the model's internal space, only translated into visible pixels at the very end.
Node 5
KSampler
The heart of the workflow. All threads converge here: MODEL, positive and negative CONDITIONING, and the empty latent. The KSampler runs the actual diffusion process — iterating over a configurable number of steps, gradually shaping the noise into a latent that matches the prompt. CFG, steps, sampler algorithm, and scheduler are all configurable here.
Output: a processed latent — still not a visible image.
Node 6
VAEDecode
The VAE translates the latent into visible pixels. This is where an actual image first appears. The VAE determines that pixel values are reconstructed correctly and without artifacts — which is why an external, well-calibrated VAE makes a visible difference with SDXL.
Node 7
SaveImage
Saves the finished image to ComfyUI's output directory and displays it on the canvas.
The data flow in one line:
CheckpointLoader → [CLIP → text fields → conditioning]
                 → [EmptyLatent]
                 → KSampler → VAEDecode → SaveImage
Seven nodes, one image. What this graph shows: image generation isn't a black box — it's a sequence of transformations where each step has a defined input and a defined output.
The Flux workflow — what changes and why
Now load the second JSON. Same process — Load or drag and drop. The graph looks more complex at first glance. It is. But the complexity isn't arbitrary.
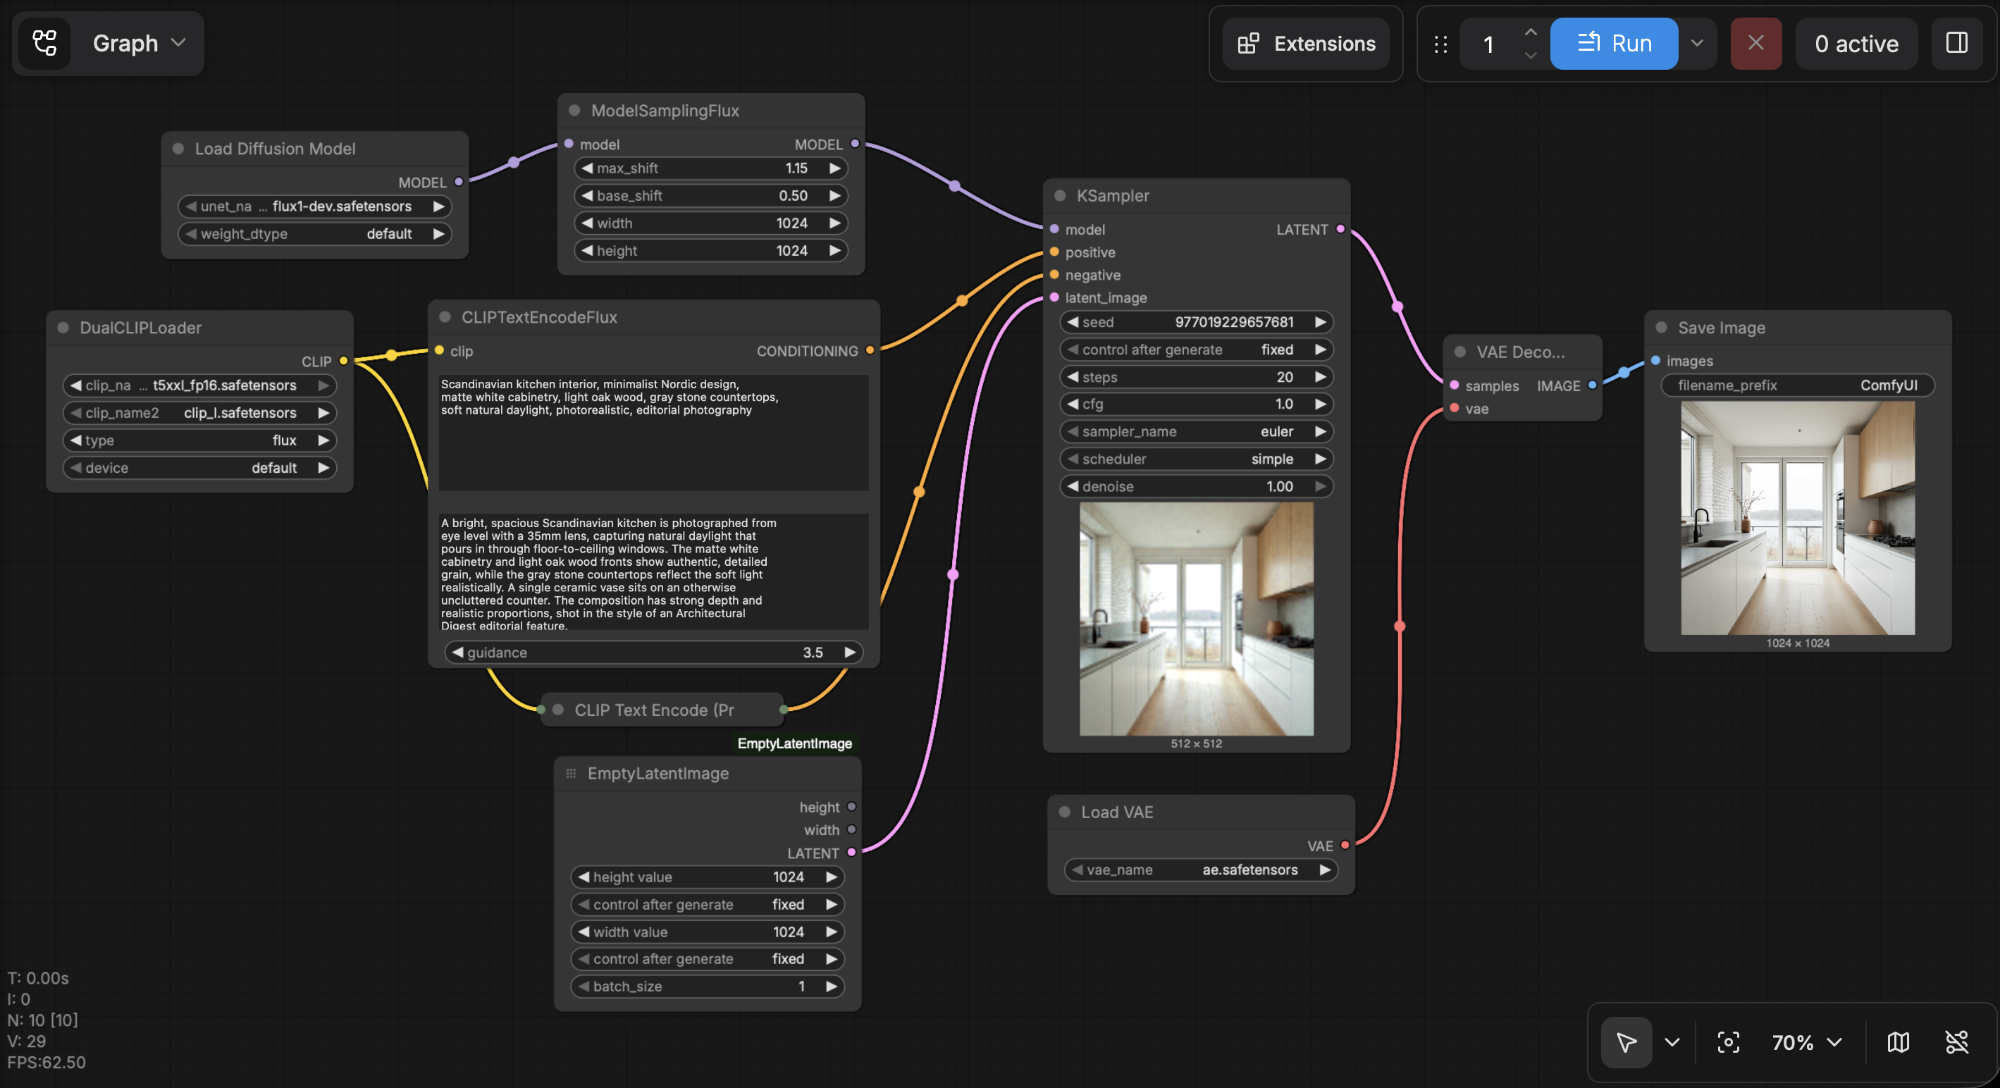
Flux.1 dev has a different architecture from SDXL — and that architecture shows up directly in the graph. Three differences stand out immediately.
Three loaders instead of one
With SDXL, a single CheckpointLoaderSimple delivers everything: model, CLIP, VAE. With Flux, that's three separate nodes:
UNETLoader— loads the diffusion model (flux1-dev.safetensors). Not "checkpoint" but "diffusion model" — Flux uses a Transformer architecture (DiT) instead of the U-Net from the SDXL generation. Stability Matrix therefore places these files in a separateDiffusion Modelsfolder, distinct fromCheckpoints. Same conceptual role, different architecture, different naming.DualCLIPLoader— loads two encoders simultaneously: T5XXL and CLIP-L. With SDXL, the encoder was embedded in the checkpoint. With Flux, they're two separate files, two different encoder types processing different aspects of the prompt.VAELoader— loads the Flux VAE (ae.safetensors) separately.
This separation isn't a drawback. It's why Flux components are flexibly combinable — T5XXL can be shared between Flux.1 and Flux.2, the VAE can be swapped without reloading the model.
CLIPTextEncodeFlux instead of two CLIPTextEncode
Instead of two separate text fields for positive and negative, there's a single node: CLIPTextEncodeFlux. And this node has two text fields — but not for positive/negative, rather for two different encoders:
clip_l— takes a keyword list, processed by CLIP-Lt5xxl— takes full sentences, processed by T5XXL
No negative prompt. This isn't a limitation of the interface — Flux is a guidance-distilled model, and the mechanism behind negative prompts is no longer available as a separate channel in the architecture. What works instead is covered in 2.4.3 — Prompts for Flux.
The third value in the node is guidance — an internal scaling factor, not CFG in the classical sense. Default: 3.5.
SamplerCustomAdvanced instead of KSampler
The KSampler in SDXL bundles everything in one node. With Flux, the sampling process is split across several separate nodes:
KSamplerSelect— selects the algorithm (euler)BasicScheduler— defines the sigma curve (simple, 25 steps)RandomNoise— generates the initial noise seedBasicGuider— connects model and conditioningSamplerCustomAdvanced— runs the actual sampling process
More nodes — but controlled complexity: each component can be swapped independently. A different scheduler, a different noise strategy, a different guider — without reconfiguring the entire sampler. Same idea as the separate loaders: modularity over bundling.
What this comparison shows
SDXL and Flux solve the same problem — text to image — but with different architectures. The graph makes those differences visible instead of hiding them.
That's the real argument for ComfyUI. Not that it's more powerful than other tools — it is, but that's not the point. It's that it's honest: what's in the graph is what actually happens. Understanding the SDXL graph means understanding what a checkpoint is, what a VAE does, why there are positive and negative prompts. Putting the Flux graph next to it means understanding why Flux requires different prompting, why there's no negative prompt, why the encoder files are separate.
No other interface gives that insight. The price is the empty canvas on first launch. The gain is knowing what you're doing afterward.
Before you run the first queue
The workflows come preloaded with example prompts — the same kitchen prompt from 2.4.2 — Prompts for SDXL and 2.4.3 — Prompts for Flux, deliberately. That way the results can be directly compared with the principles described there.
Two things to check before the first run:
Model paths: The CheckpointLoaderSimple in the SDXL workflow looks for a filename that must match exactly what you downloaded in Stability Matrix. The same applies to flux1-dev.safetensors, t5xxl_fp16.safetensors, clip_l.safetensors, and ae.safetensors in the Flux workflow. ComfyUI shows a red node when a file can't be found.
Resolution: Both workflows are set to 1024×1024 — fine for a first test, but slow on weaker hardware. For quick testing: 512×512 for SDXL, 768×768 for Flux.
Start the run via the Queue button in the top right. ComfyUI processes nodes in the correct order — following the data flow, not left to right as placed. Progress is visible in the status bar.